
Fitting the Lady Skater ~ My Journey
Saturday, February 15, 2014
As promised I am going to attempt to walk you through my fitting process for the Lady Skater. I am by no means a fitting guru. I really kind of blindly lead myself through this but it worked. I recently took Joi Mahon's Fast Track fitting class on Craftsy and I used some of what I learned here in my fitting. I also find that I like tissue fitting and it really helps when your Manny is your exact replica. Bear with me, this is gonna be a text and picture heavy post but you asked for it. Let's get started! First things first, I cut a size 3 and right off the bat I shortened the bodice front and back by 3 inches.
Muslin #1: What the Hey

Front view - There is excess fabric pooling in the armpit area pointing towards the apex.
Side view- Back bodice hangs considerably lower than the front.
Back view- Excess fabric pooling near waist and armpit area
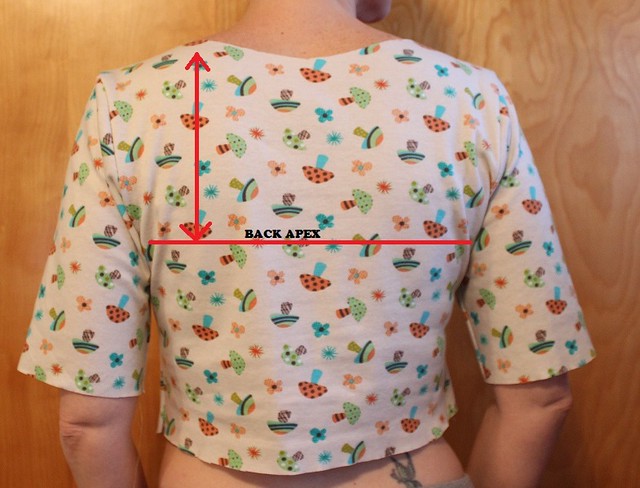
After I determined all of my fitting problems I traced my pattern on tissue paper, marked the seam allowances and did a tissue fitting. First I handled the back. All of the excess fabric in the waist area points to a sway back issue but I also have the back bodice that hangs lower than the front. I didn't do a typical sway back adjustment for this problem. Instead I shortened the upper bodice. This type of adjustment is also done for an erect upper back and according to this post this problem can be easily confused with a sway back. I don't know, do I have an erect upper back?? In any case this adjustment helped tons. One of the things I learned in Joi Mahon's Fast Track Fitting class was how to measure your body and compare those measurements to your pattern and make needed adjustments. To shorten the upper back I took my back to apex measurement and compared to the pattern. This measurement starts from your shoulder seam to your back apex area.
I shortened my upper back by 1.5 inches by simply slashing the pattern horizontally on the upper portion and overlapping my pieces the required amount. (the circle on my pattern denotes where the apex area lands on the back, it's a rough guess, doesn't have to be exact).
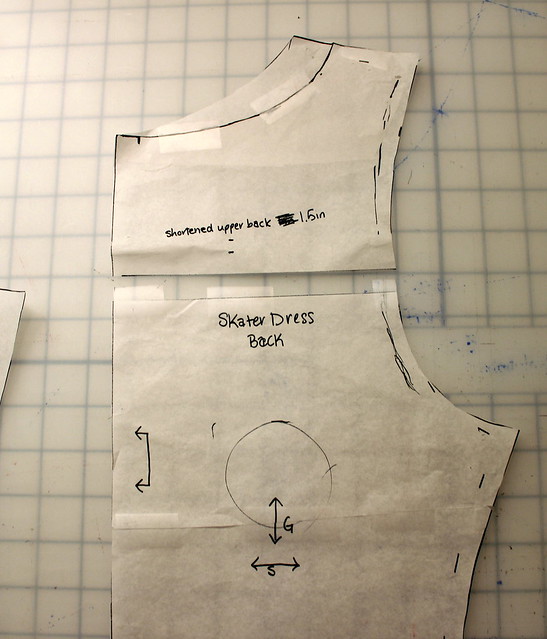
I then tissue fitted my front and back pieces on my manny to make sure they were both the same length and ending at the correct spot on my waist. You will also notice on the above picture that I did some adjustments to the armhole and neckline. During tissue fitting I sloppily traced my armhole seam to match my manny's armhole seam. Because I shortened the shoulder seam about one inch in the process I had to add this back to the neckline and grade out.
I'm telling you having a handmade dress form that is your exact twin is invaluable in the tissue fitting process.
Now on to the front. To fix the excess fabric I had pooling around the armpit area I simply pinched it out on my pattern, essentially creating a dart.
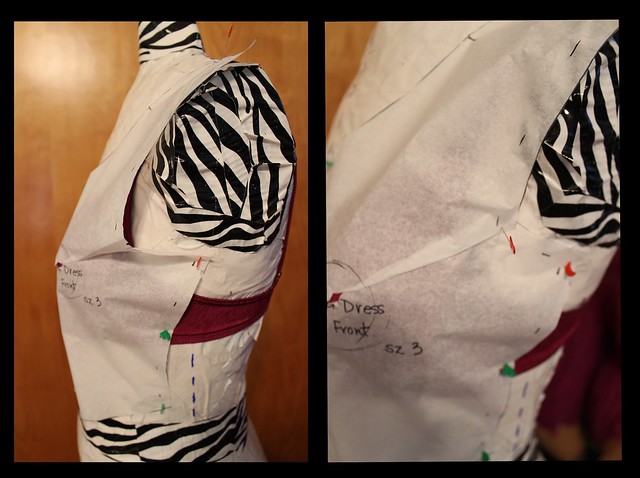
I then retraced my pattern because I didn't want to sew an actual dart onto my bodice. I guess this is what you would call a hidden dart in a pattern ?? Adding this dart will pull your center front all wonky. I straighted out my center front and smoothed out my armhole.
Muslin #2: Getting Better
Muslin #2 looks way better than the first. You can see my back bodice is now level with my front. I did some more minor tweaking to the excess fabric pooling in the front and tweaked my armholes a tad more. Instead of the 3/8th seam allowance I used a 5/8 seam allowance on my 3rd muslin.
Muslin #3: This is paying off!

I was happy enough with this muslin to move on to some real fabric. After taking pictures I discovered I still had some issues with my back, excess fabric pooling around the armhole area.

Being the perfectionist I am I couldn't leave well enough alone. I messed with my back armholes some more much the same way I did the front. I then made my leopard Lady Skater. It fits really well although my sleeves were rather hard to put in. Because I had added a hidden dart to the front bodice I also made the armhole smaller in doing so. I realized that I had forgotten to adjust my sleeve for this when I noticed all this excess ease in the front of my sleeve. (don't ask me how i didn't notice it in my red Skater ?? lack of sleep??) I somehow miraculously eased it all in. I did receive feedback on my red Lady Skater post that I wanted to try out and I also wanted to correct my sleeve ease so tonight was muslin #4, you lucky peeps! Helllloooo are you still awake??
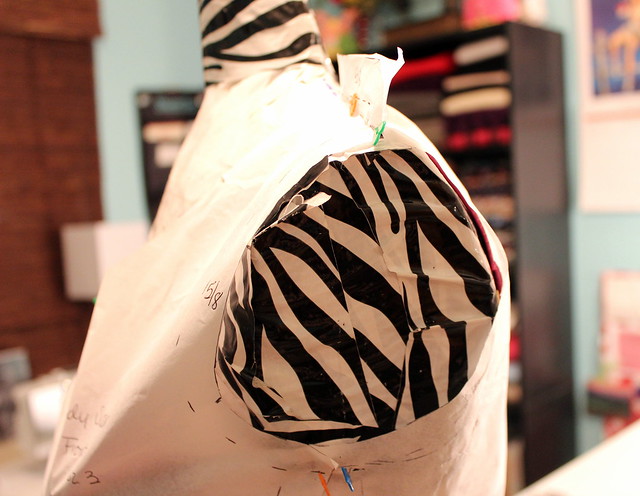
Sabine suggested my excess fabric could be due to forward sloping shoulders and to try and pinch it away from the top of my shoulders.
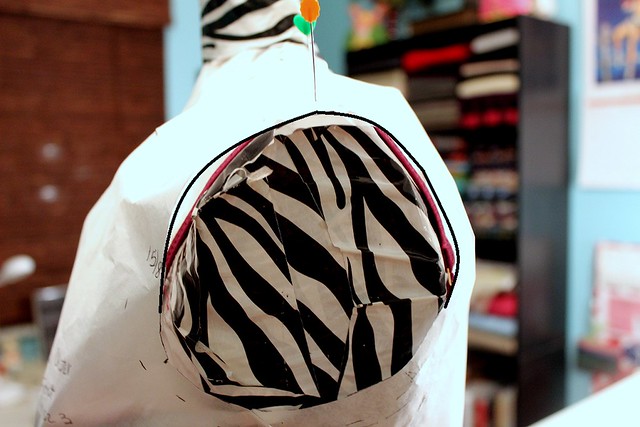
It's kind of hard to see because of the lighting so I traced around my armhole in black so you could better see how the front and back gapes open. This is exactly what is causing all the fabric pooling.
I smoothed out the excess and pinned up top and marked my new seam line on my front and back. Because your shoulders are forward sloping your new seam line will result in an angle. I added in my 5/8 seam allowance and trimmed away the excess.
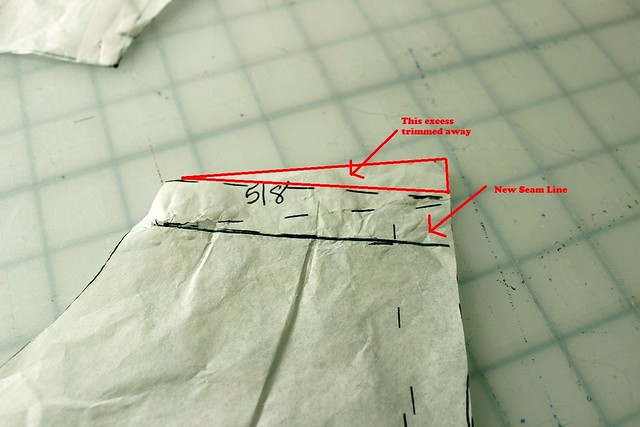
My new seam line resulted in me shrinking my armhole 1/2 inch. This will also affect my sleeve cap. I shortened my sleeve cap 1/2 inch as well by slashing the pattern horizontally and decreasing 1/2 inch. I used my sleeve ruler to smooth out the curves. Now to fix all that excess ease in the front because of my hidden dart. This was an easy fix. I simply moved the center notch on the sleevehead to the back by 1 inch. This redistributed the excess ease from the front to the back.
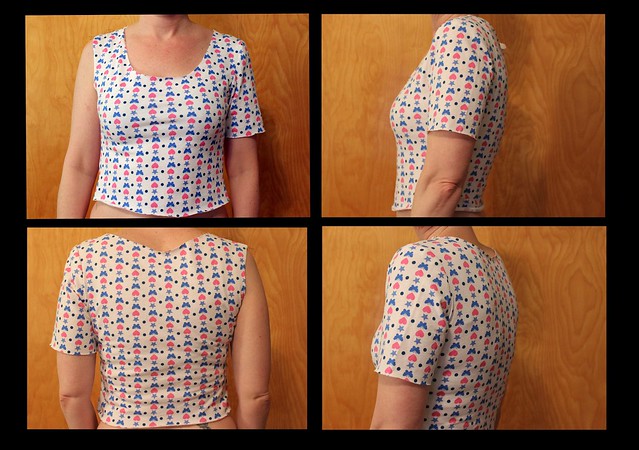
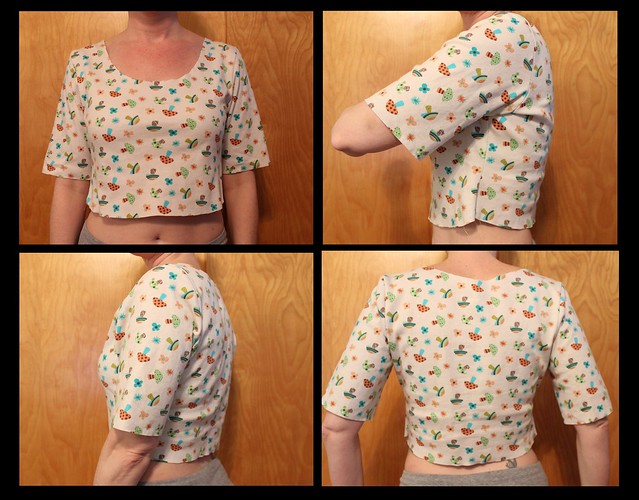
Booyah! I think my final muslin looks pretty freaking good! Feel free to click on the picture to open in Flickr to zoom in for a closer look!! A major improvement from the first muslin. Thank you to everyone for their expertise. I really hope someone finds this post helpful. I know my way of doing things probably isn't the proper way but it worked and that's all that matters in my little bubble.
Have a great weekend! Surprise surprise we got more snow so I'll be staying in all weekend putting final touches on my next TNT pattern. If you stayed with me this long well here's a little treat for you, a video of Vito in the snow. He pretty much says the hell with this! And he's not particularly fond of his shoes as they are about to flop off. This dog kills me!


20 comments
Wow! I'm a total slacker when it comes to fitting, so I really admire your dedication! The fit is amazing in the last muslin though, so I think you have me convinced. :)
ReplyDeleteYes, it IS useful! And what a difference from the first muslin to the last, it's a perfect fit!
ReplyDeleteIt is amazing that most would have been satisfied with the first muslin. However, the final is great. The biggest reason to sew over ready to wear. Fit is so much more comfortable and hey, you look great.
ReplyDeleteGosh, this is such a helpful post! Thank you for writing it. I'm a fan of tissue fitting too, but stupidly wondered how to tissue fit a stretch fabric pattern. Now I think about it, the garment only has to be stretchy enough to get on/off without a closure! Duh!! I'm going to save this post because I forsee those back-fitting issues affecting me. Lynne
ReplyDeleteWhen I first pinned my pattern on to my manny I was totally confused because my side seams did not reach completely to my sides and I was thinking I needed to cut a larger size. Then I had a Duh moment, I finally realized this pattern does have negative ease because of the stretch.
ReplyDeleteWould love to hear how it turns out. Good luck!!
ReplyDeleteAh! Negative ease - hasn't thought of that either! Thank you! I have so much to learn about fitting knit fabrics.
ReplyDeleteI have never heard of erect upper back. It sounds made up! LOL. But, actually I must have that issue rather than swayback. I have to say I don't really relish learning so many things about what is 'wrong' with my body, but I'm getting used to it and approaching it from a more scientific angle. Your adjustments look great and very easy to follow, thanks for posting them!
ReplyDeleteFantastic, you've inspired me today! I reckon there's no wrong way to do it, as long as it works. Your fitting needs are quite similar to mine I think! And you've done a simply smashing job :D you look great in your finished garments! :)
ReplyDeleteWow, this looks great! Totally worth all the work! I'm with Vito- to hell with all this snow! It's snowing AGAIN right now!
ReplyDeleteI need to remember this post when I see people complaining about patterns not fitting right. You are going to have a totally customized pattern that will fit you beautifully that you can use over and over and make variations from. But, of course, unless you are an expert at making your own patterns, the original, no matter if the fit is perfect, is still important and valuable. I think there is a pocket of seamstresses who are mature enough to realize that it's a miracle if it fits the first time and that time put into altering is not wasted. I seem to come across a lot that think it's the pattern's fault if the fit isn't right on them... ok, off my soapbox.
ReplyDeleteYou are so patient to fit everything perfectly! Great job and so worth it for a TNT.
ReplyDeleteThis was great! I love seeing the evolution, and I have actually never heard of the term "back apex." It makes total sense!!
ReplyDeleteYou know, I don't even think it really is a technical term. In the Craftsy class I think she referred to it as the back upper vertical bustline measurement. I like back apex better.
ReplyDeleteFirst off.. OMG Vito!! That was ADORABLE!!! <3 Second off I love how descriptive you are with the fitting. I won't lie, I'm awful about fitting and making a muslin. You've inspired me to make a duct tape dress form (my reg form is not my shape at all). You did great :) I do believe it's key to make sure everything fits well, or else you won't even wear it LOL... that's the story of my life! Okay I'm rambling, great job :)
ReplyDeleteYes! I had too many things I wasn't wearing because of fit which is like a huge waste of time and fabric. So I decided to put that dress form of mine to use! It's nice to have an exact replica of your body especially with my rounded shoulders and swayback. maybe I should start doing yoga or something!? lol
ReplyDeleteI have rounded shoulders really bad and I think that is why I always seem to have bodice fit issues! I think a friend and I will be making our duct tape dress forms this weekend. You're right, it's a huge waste of time and fabric if we aren't even going to wear the items. So you would recommend that Craftsy course? It's in my queue right now. I wonder if yoga would help?!
ReplyDeleteI do find myself using some of what I learned from the course but I did find her to be a little hard to follow and not very clear on her examples. I believe I could watch the course several more times and just not get it. She uses a model to show you how to take all the measurements you'll need but she does not use those same measurements when showing you how to adjust the pattern. She does a lot of slashing/spreading the patterns and it would of been helpful to have actual examples to follow instead of just quickly showing you how its done. I see she has a follow up course now that goes beyond altering the pattern into actual muslin fitting. I might take that couse if I can get it on sale and I watch the first one again.
ReplyDeleteHmm... I think I will pass on that then. I have another Craftsy course they gave me free, it's The Perfect Fit, something like that. I may just watch that one again and try to learn from her. I just kept getting distracted during it. Thanks for the honest review of it!
ReplyDeleteI considered getting that one too. Let me know how you like it
ReplyDelete